The automation designer
The designer is where you build and change call flows and automations. It lives at Call handling > Call flows > Call flow designer (/admin/call-flows) and works the same way for both kinds:
- A call flow starts when a call arrives. It plays prompts, asks for keys, routes the call and can talk to the caller.
- An automation (an event flow) starts on something else: a missed call, a voicemail, a message, a form, an event in your CRM, a timer or a click on Run now. It runs in the background.
You need the permission to read call flows to open the designer and the permission to change call flows to edit, publish, test and cancel runs. Repeating a run, the debug switch and really sending from a test need Debug automations. See Automation run history, tests and debugging.
Start a new flow
Type a name, choose Call flow or Automation, and click Create. A new automation starts from Run by hand and ends at once, so you can try it before you choose a real trigger. The first time you open the designer for your company, the template gallery (see Automation templates) is the quickest way to start; the designer is where you change what it installed.
The canvas
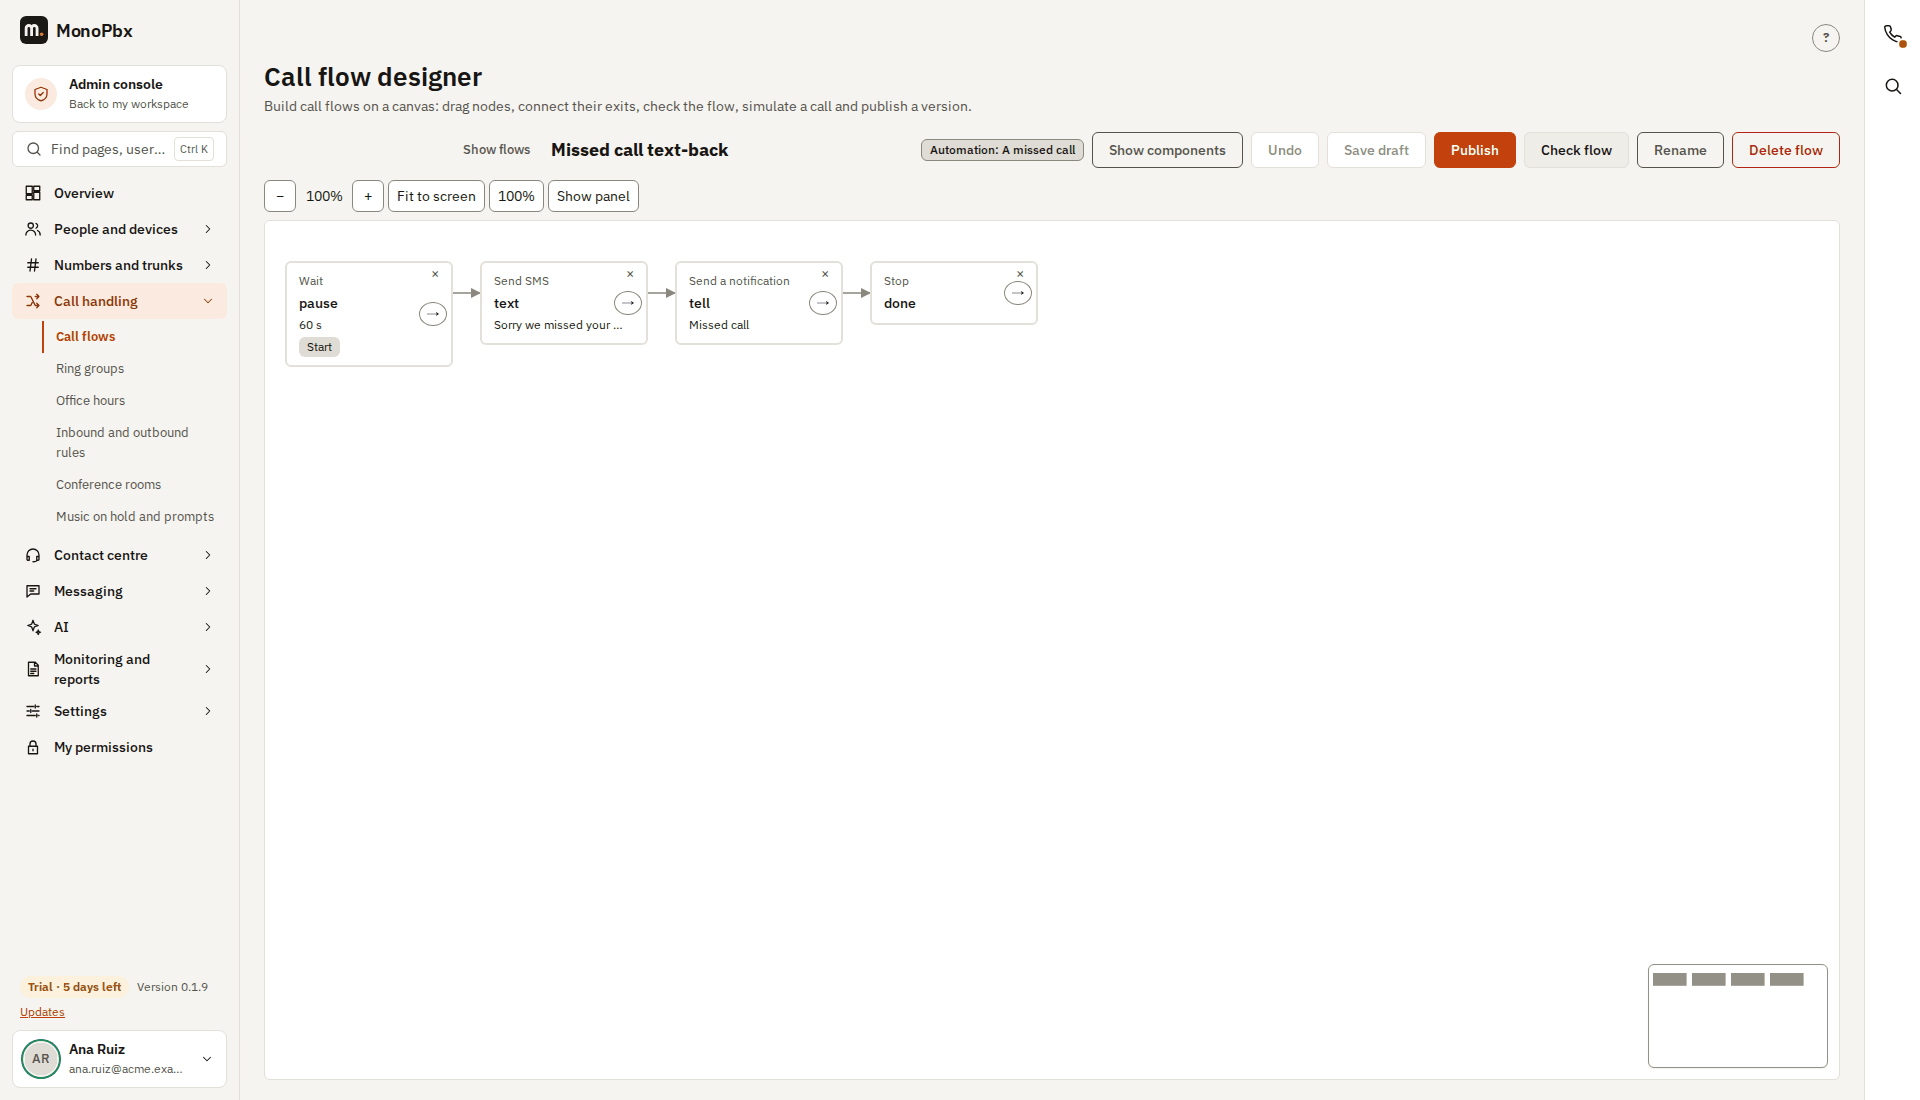
Each step is a box. Drag a component from the list on the left onto the canvas, or click it to add it. Connect steps with the arrow button on a box, or choose where each exit leads in the properties panel on the right. Everything the mouse does has a keyboard equivalent: the arrow keys move a box, Delete removes it and Enter opens its properties.
The list of components follows the kind of flow: a call flow offers the call steps (answer, play, menu, transfer ...), an automation offers messages, CRM, helpdesk, calendar, data tables, AI, waiting, approvals and the logic steps. Use the search box to find one by name or description. Steps that need something set up say so in their properties: a connected account, an SMS number, a WhatsApp channel, a team chat room or a data table.
The tag next to the flow name shows its kind and trigger. Click it to open the Flow tab.
Properties of a step
Click a step to see its properties. They are drawn from what the step needs:
- Text fields (a message, a subject, a phone number, an address) accept values from earlier in the flow. See Using values.
- Account: choose which of your connected accounts does the work (Kommo, Zendesk, Google Calendar ...). Only accounts that can do this step are listed. If there is none, a link takes you to Integrations to connect one. A flow never holds a password or a token.
- Data table, secret, switches, lists and name and value rows.
- Exits: where the flow goes next. A step with several outcomes (a switch with its cases, an approval with its buttons, a loop with its body and its end) lists every exit. Add the exit If it fails to a step to handle a failure yourself.
- Retries and results: for steps that call another system you can set how many times a failure is tried again (up to 5 in an automation, 1 in a call flow), the delay between tries, and which results to keep in variables. A message or a write is never repeated after it was sent, whatever the retry setting.
Advanced users can still edit a step as code under Advanced.
Using values
Wherever a step takes text, you can write values from the flow between double braces, for example Hi {{ vars.name }}, we missed your call from {{ trigger.caller | national }}. You do not have to remember the names:
- Type
{{and the designer suggests what the step can read, as you type. Press Enter or Tab to take a suggestion. - Click the
{{ }}button beside a field to pick from every available value, with its type: text, number, yes or no, phone number, date and time, list or record. - After a
|the designer suggests filters such asupper,national,dateanddefault.
The values come from four places: the trigger (trigger.caller, trigger.text ...), your variables (vars.name), earlier steps (nodes.lookup.found) and error details inside an "If it fails" path (error.code). The designer flags a typo while you type: an unknown variable, step, result or filter. Nothing is checked more strictly than when you publish, so a warning that stays after you finish is a real problem.
The Flow tab: trigger and variables
For an automation, Starts when picks the trigger and shows the filter that narrows it down: only matching events start the automation, and an empty field is ignored. See Automation triggers and limits for every trigger and filter.
- Schedule: how often, the time, the day of the month and the time zone.
- Run by hand: the inputs the automation asks for, each with a type.
- Webhook: create the automation's own web address and see its signing secret once. Replacing the address creates a new secret.
- Once the automation is published, Turn on and Turn off pause its trigger without a new version.
For a call flow, After the call can start an automation when the call ends, with the call's details.
Variables lists the typed variables the flow declares. A variable has a name (letters, digits and underscore) and a type. If a flow uses variables that are not declared yet, the designer offers to declare them.
A call flow made before flows v2 keeps working unchanged. Adding one of the newer steps upgrades it to the current format with the same behaviour.
Check, publish and versions
Check flow lists every problem. Click one to jump to its step. Publish makes the saved draft live; it is checked again first. The Versions tab shows every version with the live one marked, lets you open an older one and roll back to it.
Runs that are waiting (for an event, a delay or an approval) stay on the version they started with, also after a rollback. The Versions tab shows how many runs wait on each version, so you know what a rollback leaves behind.
If another administrator saved the flow while you were editing, you can keep yours, take theirs, or merge the two step by step.
Runs and tests
The Runs tab is the history of the open flow: a list of its runs with status, trigger, version and time; click one to see it as a timeline. The Simulator tab is the test panel of an automation.
- Timeline: every step in order with a bar showing how long it took, the exit it took, the attempt number of a retry and the error code of a failure. Open a step to see what it was given and what it produced. Phone numbers are masked, long texts are shortened and secrets are removed. Show on canvas highlights the path the run took.
- Cancel stops a run that has not ended. Run again repeats an ended run with the same data, on the newest version or on the same version.
- Debug mode (24 hours) keeps full inputs and outputs for a day when you need to see exact values.
- Test with sample data (the Simulator tab of an automation) runs the published version with the sample of its trigger, the last real event or data you type. It is a dry run by default: reads happen, but messages, writes, calls and notifications are only described. The result opens as a timeline. A test runs the published version, so publish your changes first; the panel tells you when you have unsaved or unpublished changes. An automation that starts by hand also has Run now with its inputs.
Call flows keep the call simulator: give it the keys pressed, the caller and the office-hours answer, and it shows the path through the flow.